
If you have older offices, retail spaces, or classrooms, there’s a good chance you’re dealing with a suspended ceiling system—those familiar white, textured tiles. Over time, dust, nicotine, cooking residue, and general grime collect on them, and acoustical ceiling cleaning becomes essential. Done wrong, you can stain, warp, or even ruin the tiles. Done right, you restore brightness, improve air quality, and extend ceiling life. In this guide, All Thermo Insulation walks you through a safe, step-by-step process.
What Is an Acoustical Ceiling and Why Does Cleaning Matter?
Acoustical ceilings (often called drop ceilings or suspended ceilings) are made from porous tiles designed to absorb sound and reduce echo. That same porous surface that helps with acoustics also traps:
- Dust and dirt
- Nicotine and smoke residue
- Grease and cooking vapors (in kitchens)
- Mold or mildew stains in humid areas
Left alone, dirty tiles don’t just look bad—they can affect light reflection, contribute to poor indoor air quality, and make your whole space feel neglected. Cleaning is a lot cheaper than full replacement, but it has to be done gently to avoid damaging the tiles or affecting their fire rating.
For more background on how dust and particles impact indoor air quality, you can check the U.S. EPA’s info on indoor air quality.
Step 1: Inspect the Ceiling Before You Touch Anything
Before you grab a ladder and spray bottle, take a slow walk under the ceiling and look closely:
- Check for moisture stains. Brown or yellow rings can indicate leaks above the tiles. Cleaning alone won’t fix this—you must address the source of moisture first.
- Look for sagging or cracked tiles. Severely damaged tiles should usually be replaced, not cleaned.
- Note areas with heavy buildup. Above cooking equipment, near air vents, or smoking areas often need extra attention.
If you see active leaks, mold, or structural damage, stop and get those issues handled first. Cleaning a wet or moldy tile can spread contamination and worsen the problem.
Step 2: Gather the Right Tools and Supplies
Using harsh chemicals or the wrong tools is one of the fastest ways to ruin acoustical tiles. Here’s a safer list to work with:
- Soft-bristle brush or microfiber dusters
- Vacuum with a soft brush attachment
- Non-abrasive, non-solvent ceiling cleaning solution (specifically labeled safe for acoustical tiles)
- Spray bottle or pump sprayer with a fine mist
- Clean, lint-free cloths or microfiber towels
- Plastic sheeting or drop cloths to protect furniture and flooring
- Ladder or platform that allows you to work comfortably and safely
Avoid bleach, strong degreasers, and soaking the tiles with water. Acoustical tiles are not designed to be saturated.
Step 3: Dry Clean First – Remove Loose Dust and Debris
Always start dry before you introduce any moisture:
- Protect the area. Lay down plastic or drop cloths over desks, shelving, and flooring.
- Vacuum gently. Using the soft brush attachment, lightly vacuum each tile to remove loose dust and cobwebs. Don’t press hard—just skim the surface.
- Use a soft duster. For corners, edges, and around light fixtures, use a microfiber duster or soft brush to knock down dust and debris.
This step alone can dramatically improve the appearance of the ceiling and makes later cleaning more effective.
Step 4: Test Your Cleaning Solution on a Hidden Area
Acoustical tiles vary in composition and finish. Before you spray the entire ceiling:
- Choose a corner or area that’s not highly visible.
- Lightly mist the cleaning solution onto a small section of one tile.
- Wait a few minutes and check for discoloration, warping, or raised fibers.
If the tile darkens slightly while wet but returns to normal when dry, that’s typically fine. If it leaves a permanent mark or fuzzy texture, you need a milder solution or a different product specifically designed for acoustical ceiling cleaning.
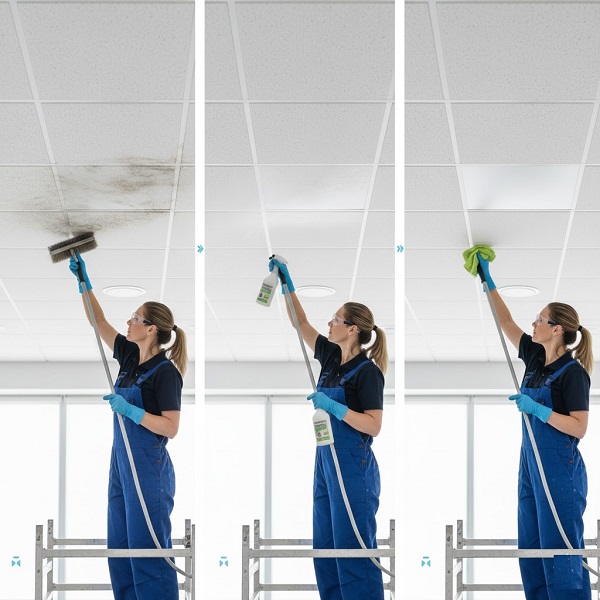
Step 5: Lightly Mist and Wipe – Don’t Soak the Tiles
This is where most people go wrong. The goal is light, controlled cleaning, not washing the tiles like a wall.
- Work in small sections. Focus on a few tiles at a time instead of the whole room.
- Mist from a distance. Hold the sprayer 12–18 inches from the tile and apply a fine mist. Avoid visible droplets running down the surface.
- Let the cleaner work. Give the solution a minute or two to break down surface dirt and stains.
- Blot, don’t scrub. Using a clean microfiber cloth, gently blot the tile surface. If you must wipe, do it with very light pressure in one direction.
Never saturate the tile. Excess moisture can cause warping, sagging, or damage to the backing material.
Step 6: Tackle Stubborn Spots Carefully
For heavier stains (like nicotine, cooking grease, or old marks):
- Apply a second light mist of cleaner to the stained area only.
- Use a soft cloth with slightly more pressure, but still avoid aggressive scrubbing.
- For lingering stains, it’s often better to replace individual tiles rather than risk damage.
If you find yourself scrubbing hard, that’s your signal: you’ve reached the limit of what safe cleaning can do for that tile.
Step 7: Let Everything Dry and Inspect Your Work
Once you’ve worked your way across the room:
- Allow the ceiling to dry completely. This may take a few hours depending on humidity and ventilation.
- Turn the lights on and inspect from multiple angles. Clean tiles should look brighter, more uniform, and reflect light better.
- Note any tiles that still look stained or damaged—those may need replacement.
At this stage, you’ll see a noticeable improvement in the overall look and brightness of the space.
Common Mistakes to Avoid When Cleaning Acoustical Ceilings
To protect your investment and keep from creating a bigger problem, avoid these pitfalls:
- Using bleach or harsh chemicals. They can compromise the fire rating, discolor tiles, and weaken the material.
- Soaking the tiles. Excess water leads to warping, sagging, and potential mold growth.
- Scrubbing aggressively. Over-scrubbing can raise fibers, create fuzzy patches, and permanently damage the surface.
- Ignoring the source of stains. If a leak, smoking area, or vent issue isn’t fixed, stains will just return.
When to Call a Professional Ceiling Cleaning Company
DIY acoustical ceiling cleaning can work for light to moderate dirt. But if you’re dealing with:
- Large commercial spaces
- Heavy nicotine or grease buildup
- Mold concerns or water damage
- Tight timelines and limited staff
…it’s usually more cost-effective and safer to bring in professionals.
A company like All Thermo Insulation has the right equipment, commercial-grade ceiling-safe cleaners, and trained technicians who know how to clean tiles without damaging them or disrupting your business. Plus, a professional team can often clean large areas after hours to minimize downtime.
To see how this fits into your building’s overall comfort and efficiency strategy, you can also explore All Thermo Insulation’s insulation and ceiling services as part of a broader maintenance plan.
Final Thoughts
Acoustical ceilings do more than just hide ductwork and wiring—they help control sound and keep your space feeling professional. With the right approach to acoustical ceiling cleaning, you can refresh your tiles, improve lighting, and support better indoor air quality without risking costly damage.
If you’d rather have an experienced team handle it, All Thermo Insulation is ready to help you assess your ceiling, recommend the safest cleaning approach, and coordinate everything around your schedule.